
Customers today expect frictionless onboarding experiences. One-click signups using SSO providers, such as Google One Tap, are proven to significantly reduce abandonment and boost conversions by simplifying and speeding up the signup process. Implementing Google sign-in opens new opportunities for streamlined user engagement and lead generation, but the process can be challenging for developers.
This guide will walk you through setting up one-click Google signups for your web app. We will call out critical details that require careful attention to ensure a smooth, secure, and scalable integration.
Why One-Click Google Signups Matter for Your Business
Contents
The UX Advantage
Offering a one-click signup option reduces friction, making it easy for users to log in without creating yet another account or remembering another password. Businesses benefit from higher conversion rates as users are more likely to engage when they don’t face a long registration form.
Boost Conversions with One-Click Google Signups
By simplifying the signup process, you’ll not only capture more leads but also deliver a seamless experience that reflects positively on your brand. However, creating this frictionless experience requires more than just a quick button installation—it’s about understanding how each step impacts user trust and engagement.
Understanding the OAuth 2.0 Workflow: A Primer
To implement Google sign-ins, you’ll need to work within the OAuth 2.0 framework. OAuth enables secure authorization without exposing user credentials. Here’s how it works at a high level:
- User Authentication: The user clicks the “Sign in with Google” button on your landing page, and OAuth begins the process of verifying their identity.
- Authorization and Token Exchange: The third-party OAuth provider authenticates the user, securely exchanging tokens between the user, the provider, and your application.
- Scopes: Permission to access different types of information about the user is divided into separate scopes. This protects the user’s data by allowing applications to get permission only for the data they need in a given situation, while the rest remains unshared. For sign-up purposes, it’s common to collect information like the person’s name, email, and phone number.
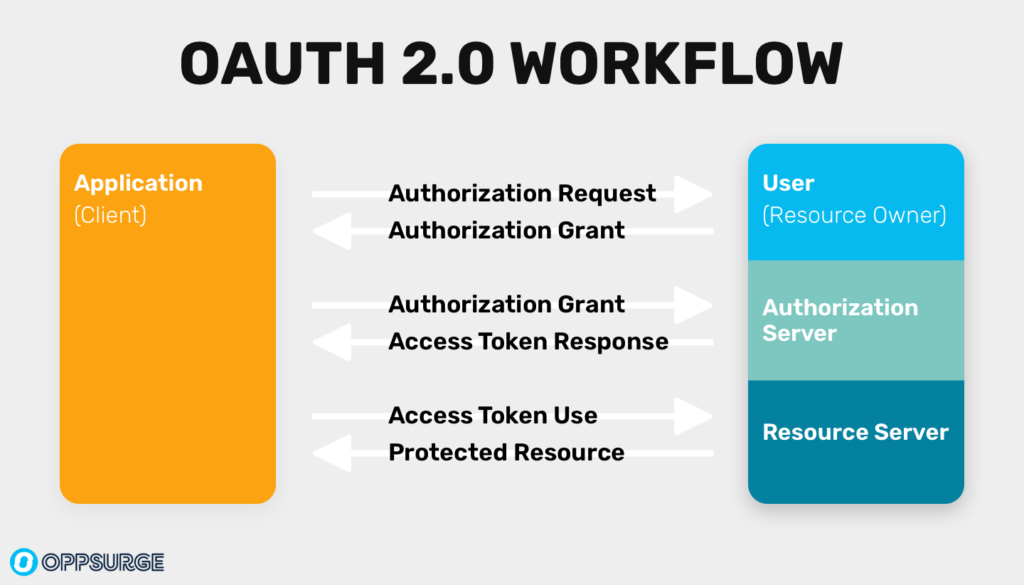
While OAuth handles much of the heavy lifting, it’s important to understand the data flow in order to deal with issues you may encounter while setting up the flow.
It’s also important to make sure you’ve correctly secured all relevant points in the flow of data to protect both the customer and your application. Small misconfigurations in the OAuth flow could introduce unnecessary complications, but following best practices will minimize these risks.
Step 1: Create a Google Developer Project
To get started, you’ll need to set up a project in the Google API Console at https://console.cloud.google.com.
If you don’t already have a project set up, use the project selector drop-down at the top of the screen and select New Project, then enter a name for your project.
Create a Google API Client ID
- Go to https://console.developers.google.com/apis and click Credentials.
- Click Create Credentials.
- Select OAuth Client ID as the type.
- For application type, select Web Application.
- Leave Authorized JavaScript origins empty if you are handling the OAuth response on the server, as shown in this guide. It is also possible to handle the response on the client side, in which case you need to enter your production and origin URLs here. We’ll use Authorized redirect URIs instead (see below).
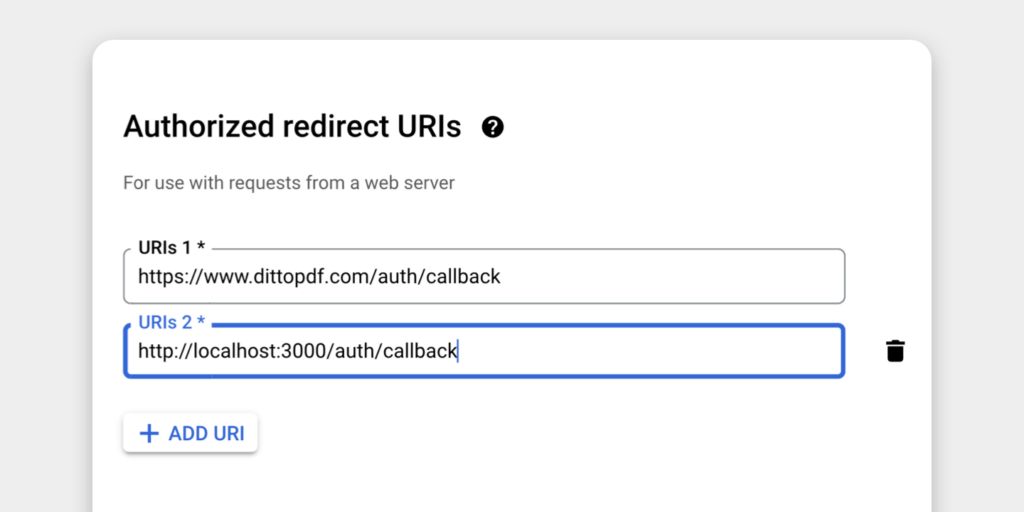
- Under Authorized redirect URIs, enter your production and testing URLs. These should begin with
httpsexcept forlocalhost(if needed). The exact URLs are up to you and depend on how you’re configuring your application. They should be the URL of your server-side endpoint that will receive the auth response from Google. You will configure the “sign up” button so that it flows to one of these endpoints when clicked. Include both your production URL, e.g. https://www.example.com/auth/callback, and any local testing URLs your site uses during development, e.g. http://localhost:3000/auth/callback.
Configure Project Settings
You’ll need to configure your project’s OAuth consent screen, which includes branding and specifying the types of data your app will access. This step can take some time, especially when navigating through various Google Cloud settings, but getting it right is essential to user trust.
- Email address for privacy inquiries: You’ll need a Google account to be listed as the contact for privacy issues. If you don’t already have one, consider creating a new
privacy@yourdomain.comemail address and corresponding Google account for this purpose, and make sure the emails go to a monitored inbox.
Step 2: Configure OAuth Consent Screen
The consent screen is the first thing users will see when they sign in with Google. It’s crucial to ensure that your consent screen is clear and user-friendly. This screen explains to the user who is asking for permission to access their Google profile information. It’s important that you provide accurate and helpful information to the customer here.
- App Name
- Your application’s name, to be displayed prominently in the user consent flow.
- User support email
- This will need to be a Google account with permission to access your API project in Google (you must select an account from a drop-down and cannot enter an arbitrary email).
- App Logo
- Upload a square 120px by 120px version of your app’s logo, to display in the consent flow. This is important to reassure customers that they’re dealing with you, and to make sure you’re consistent with how your brand is presented.
- App Domain
- Your production website URL, e.g.
http://www.example.com
- Your production website URL, e.g.
- Authorized Domains
- This should have been automatically filled out with your app’s domain when you completed Authorized redirect URIs in an earlier step.
- Developer contact information
- Specify the person to be notified by Google in case of any important changes.
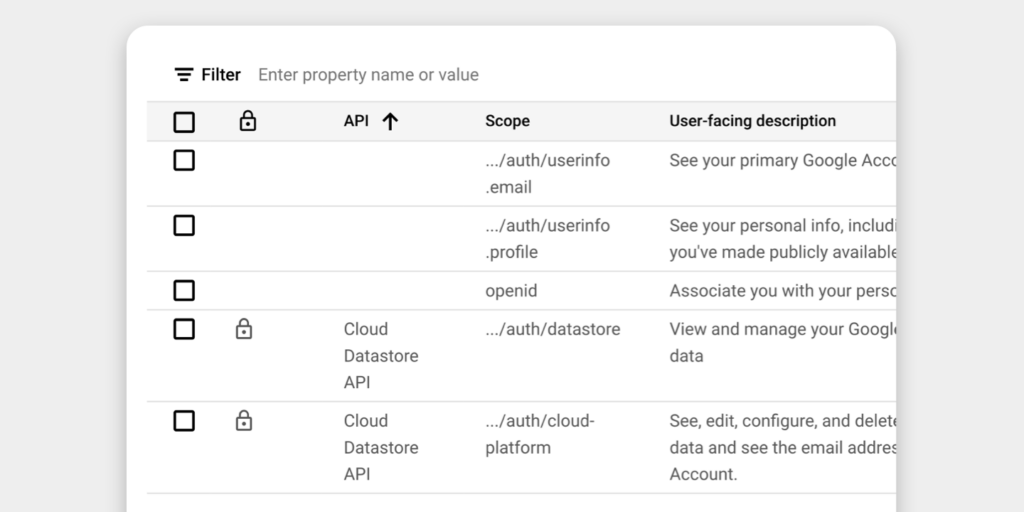
Specify Scopes
Determine what user data your app needs. Misjudging the scopes can lead to unnecessary user friction, so keep it as minimal as possible to avoid users abandoning the signup. In most cases, you can get the profile information you need for a signup without adding additional scopes here.
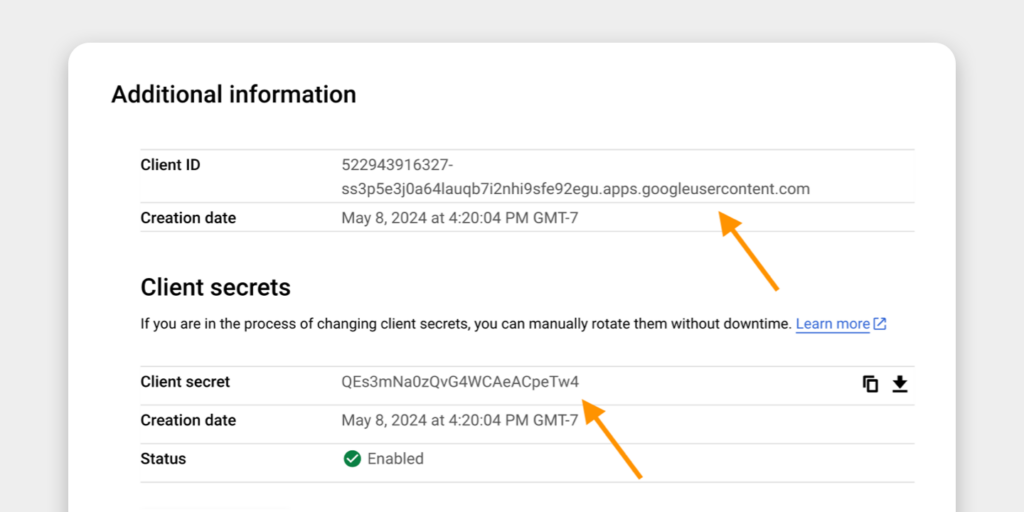
Step 3: Copy your OAuth Credentials
Now, you’ll need to generate your OAuth 2.0 credentials (Client ID and Secret) to connect your web app with Google.
- Client ID and Secret: These keys allow your app to securely communicate with Google. Be sure to store them securely, as any mishandling could compromise the security of the entire process. Managing these credentials efficiently is crucial, especially as your app scales.
Step 4: Embed the Google Sign-In Button on your landing page
Google provides a script to easily embed the “Sign in with Google” button on your website. It’s a straightforward process, but placement and visibility are key to maximizing user interaction.
First, copy the embed code from https://developers.google.com/identity/gsi/web/guides/display-button and replace the Client ID with the one from your Google dashboard:
<script
  src="https://accounts.google.com/gsi/client"
  async
></script>
<div id="g_id_onload"
    data-client_id="YOUR_GOOGLE_CLIENT_ID"
    data-login_uri=
      "https://your.domain/your_login_endpoint"
    data-auto_prompt="false">
</div>
<div class="g_id_signin"
    data-type="standard"
    data-size="large"
    data-theme="outline"
    data-text="signup_with"
    data-shape="rectangular"
    data-logo_alignment="left">
</div>
Paste this into your landing page where you want the button to appear.
- Design Tip: Ensure the button is prominent on your signup page. It’s tempting to think a quick implementation here is enough, but testing button placement, size, and wording will have a significant impact on conversions.
Step 5: Set up backend code to handle the user authentication response
Once a user clicks the button and logs in via Google, your app will receive a token that contains user data and/or allows you to retrieve further data according to the scopes you’ve requested per your Google OAuth consent screen setup (above).
How exactly you implement this processing step will depend on your technology stack. Here, we’ll give an example of processing the Google response in a Next.js server-side API route handler. Google provides client libraries that help to implement this step for many popular server-side frameworks. Here, we’re using the googleapis Node.js library.
You’ll need to set up the route handler on the URL that you listed in Authorized redirect URIs (for example, https://www.mydomain.com/auth/callback).
import { type NextRequest } from 'next/server';
import { google } from 'googleapis';

/**
* Handle the Google auth callback.
*/
export async function GET(request: NextRequest) {
  const oauth2Client = new google.auth.OAuth2(
    'MY_GOOGLE_CLIENT_ID',
    'MY_GOOGLE_CLIENT_SECRET'
  );

  google.options({ auth: oauth2Client });

  const { error, code } =
    Object.fromEntries(
      request.nextUrl.searchParams
    );

  if (error) {
    // An error response e.g. error=access_denied
    console.error(error);
    return Response.json({
      message: 'Not authorized'
    }, { status : 401 });
  }

  const { tokens } = await
    oauth2Client.getToken(code);

  oauth2Client.setCredentials(tokens);

  const oauth2 = google.oauth2({
    auth: oauth2Client,
    version: 'v2'
  });

  const { data } = await oauth2.userinfo.get();
  const { email, family_name, given_name } = data;

  // Now use information from the user profile to
  // complete the signup

  return Response.redirect('/signupComplete');
}
Send the signup information to your CRM
Once your server code has extracted the relevant fields from the OAuth profile data, you will usually want to create a new contact in your CRM system. Here, we’ll use Hubspot as an example. If you’re not using Hubspot, your code will look similar but might use different client libraries or endpoints to send the data.
- Map the profile fields to the fields in your CRM
- Most fields have a clear correspondence, but may require some adjustment to align naming. For example, the field that Hubspot calls
firstnameis calledgiven_nameby Google, and Hubspot’slastnameis Google’s family_name.
Example code to send a contact to Hubspot:
- Most fields have a clear correspondence, but may require some adjustment to align naming. For example, the field that Hubspot calls
// POST the user profile to a new Hubspot contact
const response = await
fetch(`https://api.hubapi.com/crm/v3/objects/contacts`, {
  method: 'POST',
  headers: new Headers({
    'Content-Type': 'application/json',
    'Authorization': `Bearer ${myHubspotToken}`
  }),
  body: JSON.stringify({
    firstname: googleProfile.given_name,
    lastname: googleProfile.family_name,
    email: googleProfile.email
  })
});
Step 6: Navigating Common Pitfalls
Even with a well-implemented Google signup process, there are a few things to watch out for that could affect your conversion rates:
Overcomplicating Post-Signup Steps
Be careful not to ask for too much information after the user has signed in. Every additional form field after the initial login adds friction, which can lead to abandonment.
Mobile Optimization
With so many users signing up via mobile, ensuring your Google signup button is mobile-friendly is essential. Small UX issues—like an improperly scaled button or difficult-to-navigate form—can reduce your mobile conversion rates significantly.
Information not available via OAuth
It’s likely you need to obtain further information about the customer beyond what’s available in the OAuth scopes, for example company size, goals, or budget. You will need to design a flow that allows you to capture this information together with the information from the customer’s OAuth profile. Tools like OppSurge can make this process point-and-click to eliminate errors.
Step 7: The Role of Security and Compliance
Implementing one-click Google signups is only part of the solution—you also need to ensure user data is handled securely. Stay compliant with GDPR, CCPA, and other data protection regulations.
- Data Encryption: Ensure that all user data and tokens are encrypted, not only during transmission but also in storage.
- SSL and API Security: Your site must use SSL for all client-server communications.
Though Google’s OAuth process itself includes a high level of security, you are responsible for how your own code handles any retrieved user information, and overlooking any of the finer points of data management can quickly lead to compliance issues. Following best practices here is important to guarantee that your users can trust the signup process.
Conclusion: Streamlining the Signup Process for Conversions
Adding the button is only the beginning of successfully setting up one-click Google signups. From OAuth configuration to handling user sessions, data flow, security concerns, and compliance, the process involves several layers of technical design choices that impact user experience and, ultimately, your conversion rates.
While this guide provides a clear path, if you find yourself bogged down by the complexities—or simply want to fast-track implementation—OppSurge is here to help. Our platform simplifies the entire setup, letting you focus on what matters: growing your business.